Duck Attack! is a new game for a classic platform: the Atari 2600 (aka the Atari VCS: Video Computer System.)
Below is an online version of the users’ manual that’s shipped with each copy of the Duck Attack! cartridge.
1. The story
For years, the elusive mad scientist Dr. Enrique MacGuffin has been genetically engineering giant, radioactive mutant ducks. These ducks are said to lay eggs of pure plutonium, which, the authorities say, Dr. MacGuffin is planning to use to create a doomsday device.
The authorities have finally located his secret lair, and have asked you, a renowned robotics inventor, to explore the lair and retrieve the radioactive eggs before MacGuffin can use them in his doomsday device.
Naturally, you don’t want to go in there yourself, since the place is teeming with radioactivity, but you know just who to send: your brand-new robotic creation, who is immune from the effects of the deadly radiation.

With your trusty robot’s help, you can explore the lair and collect the plutonium eggs — but watch out: the mutant ducks are in there too, and they would love nothing more than to eat a metallic intruder. And no doubt Dr. MacGuffin has filled his many rooms with other deadly creatures and mechanical booby traps.
2. The basics
The object of the game is to collect enough eggs to advance to the next level, while avoiding the mutant, fire-breathing ducks, and other deadly objects.
3. How to play
Duck Attack! is a one-player game. Be sure a joystick controller is connected to the left controller port. An optional AtariVox, SaveKey or compatible device can be connected to the right controller port to enable additional features, but is not required to play the game. (See the “AtariVox Features” section for more details.)
To start a new game, first press GAME SELECT to choose the starting level (Level 1 is the easiest).
Once you’ve selected the desired level, press GAME RESET to begin. The robot you control will appear in the Score Room.

To exit the score room and enter Dr. MacGuffin’s lair, move the joystick to the left until the robot goes through the blue door on the left.

Using the joystick, move up, down, left, right or diagonally to explore the lair and look for the radioactive eggs.

When you find an egg, first pick it up by colliding with it. Then, find the door that the egg opens. In the first few levels, this door will be the same color as the egg. Collide with the door while carrying the egg and the door will open, and the egg will be transported to the egg shelf room where it belongs.

You can then go through the now-open door to explore previously locked areas and look for the next egg.
If you are playing Level 1, the first egg you will find will be flashing red; pick it up and take it to the red door to unlock the door. Once you enter the red door, locate the second egg (flashing blue). Upon finding the blue egg, pick it up and take it to the blue door. After opening the blue door, you have completed Level 1!
For each egg you collect, you earn 200 points. Once you collect all the eggs in a level, your robot will do a happy dance and you will advance to the next level. You earn a 1,000-point bonus for each level you complete.
If you manage to complete Level 12 by collecting all 25 eggs, you have accomplished your mission! (And your robot will do an even happier dance.)
4. The ducks
As you search for eggs, beware of the giant mutant ducks patrolling the premises. If they’re on the opposite side of the room you’re in, they will try to incinerate you by blasting you with a deadly fireball, and if you get too close, they’ll open their beaks and eat you!
There are ten different ducks in Duck Attack!, each with its own speed and personality. The brown duck is the slowest, the gray duck is a little faster, the blue duck is even faster… and when you come across the red duck, watch out!

5. Other dangers and obstacles
There are other dangerous creatures and objects; some will chase you, some will simply run you over if you get too close: avoid them!
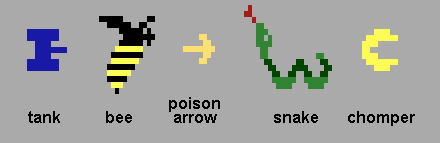
In general, if it moves (or shoots at you), get out of its way, and if it doesn’t, pick it up for points or special powers.
Fortunately, your robot is only vulnerable in one spot: the Central Processing Unit (CPU). The CPU is the differently-colored section in the middle of the robot. If a dangerous object or creature comes into contact with the CPU, your robot will be damaged or lose a life.
However, merely brushing up against a deadly object with the robot’s arm, leg, or antenna is OK, and no damage will result. Robot arms, legs and antennae are very resilient!


Another danger to look out for is the river: its current is swift and deadly. You can tell where a river is by its shimmering blue and green color. If you touch a river, its current will sweep you away and into the ocean, where you’ll drown, unless you can swim back to dry land quickly enough (and unless the water snakes get you first!)

There are also a number of trap rooms, where the walls will close in on you from above and below if you don’t make it out of the room in time:

If you get caught between the walls, you’ll be pinned there and it will only be a matter of time before a duck or snake comes by to snack on you.
There are two ways to ensure you can escape a trap room safely: either pick up a pink balloon to achieve super-speed, or a blue balloon to gain the ability to float above walls.
And last but not least: you will need to go through doors to get from one area of the lair to another, but not all doors are helpful. Some are actually booby-traps that will drop you in an area you cannot get out of!
If you are trapped in a wall (or between walls), you can press GAME RESET to end the current life and start the next one (if you have any lives left) rather than sit around and wait for a duck or other creature to find and eat you.

One of the doors will drop you into this hole, from which you cannot escape… but which one?
6. The zapper
Your best weapon against the ducks is the duck zapper. The duck zapper is a flashing yellow object shaped like a lightning bolt.

To use it, first pick it up by colliding with it. Then, when a duck is near, push the joystick in the direction you want the zapper to go, and throw it at the duck by pressing the “fire” button. If you are not pushing the joystick in any direction when you press “fire,” the zapper will be thrown to the left.
The zapper will stop when it hits a wall. If there is no wall in its way, it will continue on into the next room. If the zapper hits the duck, the duck will be stunned for about a minute. Hitting a duck with a zapper earns 400 points.

After the minute is up, the duck will revive and resume its pursuit of you, so use that minute wisely! (In later levels, the ducks revive more quickly; eventually, they only stay stunned for a few seconds.)
If your throw misses but the duck accidentally wanders into the zapper anyway, it will still be stunned, but you will only earn 100 points. You can use this to your advantage in rooms with lots of walls by dropping the zapper between you and an attacking duck; if the zapper is dropped in the right spot between you and the duck, the duck will run into it on its way toward you and stun itself.
This technique is handy in “tight-squeeze” rooms where it would be tough to throw the zapper very far without it hitting a wall first. You won’t get as many points this way, but it will stop a pursuing duck and give you some breathing room.
Once you’ve zapped a duck, the zapper will turn gray, indicating it has discharged. Hitting a duck with a discharged zapper has no effect.
You can also use the zapper on the snake (for 300 points) and the bee (for 500 points), although you will need to hit these creatures with a thrown zapper; unlike the ducks, no points are earned if they simply wander over the zapper.

7. Recharging the zapper
After you’ve discharged the zapper by zapping a duck, snake or bee, it will need to be recharged before it can be used again. Fortunately, there are several zapper recharging stations available. The recharging stations look like electrical outlets, and can be used to recharge the zapper an unlimited number of times.

When a recharging station is active (ready to charge a discharged zapper), it will flash yellow. To recharge a zapper, bring it to the recharging station and touch the zapper to the outlet. It will be instantly recharged and ready to zap another duck. But be careful: don’t touch the outlet yourself, or you’ll be electrocuted and lose a life.
When a zapper has been recharged, it will change color from a dull gray to flashing yellow, and the recharging station will change colors to white. There is no limit to the number of times you can recharge a zapper.
In later levels, you will find special “super stations” that flash red instead of yellow. These will super-charge the zapper, giving it such power that it will stun whichever duck it hits for the duration of the level.
Use the super station the same way you use a regular station: touch the zapper to it to super-charge it. The zapper will flash red instead of yellow to indicate it’s been super-charged.


This is especially handy on later levels where the ducks have become more immune to normal zaps, and recover more quickly. But be careful: you can only use the super-zapper once per level, so be sure to pick which duck you zap with it wisely. Since the ducks move at different speeds, you don’t want to waste a super-zap on a less aggressive duck if a more aggressive one is right around the corner.
Use caution where you aim: hitting a super-zapped duck with a regular zapper will cancel the effect of the super-zapper, and the duck will revive!
8. Balloons
As you explore the lair, you will encounter balloons of various colors. Each color indicates a different power or point-value you earn by picking up the balloon:

At the start of each level, a green balloon will appear. Picking it up will earn you an extra life! (But watch out for the tank that guards it.) You can have up to 15 lives in reserve.

Picking up a pink balloon will super-charge you! When you’re super-charged, your speed is increased and you can absorb one hit (from a fireball, snake, poison arrow, etc.) without losing a life. Once you’re hit, you lose the super-charge and revert to your original speed.

Every once in a while, a flashing gold balloon will appear when you enter a room… pick it up for 5,000 points.

If you’ve already earned enough extra lives to fill up your reserve of 15, you will be rewarded with a 3,000-point yellow balloon at the start of the next level.

You’ll have to become an expert player to encounter the elusive red balloon.

Picking up a blue balloon lets you float above the walls. You can even float from room to room, and over any rivers you encounter. To pick up the balloon, collide with it. To release the balloon, press the “fire” button.
Like the zapper (and unlike the other balloons), the blue balloon can be picked up, moved from place to place, dropped, and picked up again. You can carry up to two objects at a time.
The blue balloon is handy for floating over rivers, walls and trap rooms. But don’t let go of the balloon over a river, or you’ll be swept away and drown. And don’t let go of the balloon while you’re in a wall, or you’ll be stuck in that wall and have to sacrifice a life by pressing GAME RESET (or getting eaten once a duck, snake or bee happens by.)
Although the balloon will help you through the walls, certain barriers are so high that even the balloon cannot help you. These barriers are the bars on the left, right, top or bottom edge of certain rooms that are colored differently from the rest of the room.

The barrier on the left can’t be crossed… even with the blue balloon.
In later levels, some of the eggs and doors are hidden behind walls you will need the blue balloon to cross.
9. Carrying objects
You can carry up to two objects at once. For example, you can carry the zapper and the shield, or an egg and the blue balloon. To drop both objects you’re carrying, press the fire button. If one of the objects is the zapper, you’ll need to press the fire button twice: once to throw the zapper and once to release the other object.
If you’re already carrying two objects, you don’t need to drop them before picking up another object; just collide with the object you want, and the first object you picked up will automatically be dropped, leaving you with the second and third objects.
There is an exception to this rule: if you are carrying the blue balloon and a second object, and collide with a third object, you will keep the blue balloon, drop the second object, and pick up the third object. This helps prevents you from accidentally releasing the blue balloon and getting stuck in a river or wall.
10. The magnet

The magnet first appears in Level 2 (Level 1 if Random Mode is turned on.) You can use the magnet to reach objects that are otherwise inaccessible — for example, items “trapped” on the opposite side of a barrier that cannot be crossed with the balloon. To use the magnet, bring it into the room with the desired object, and that object will float towards it.
11. The shield

The shield first appears in Level 3. It protects you against all deadly objects except the snake, the ducks, and the rivers. And although a duck can still eat you if you’re carrying the shield, its fireballs will pass over you harmlessly. To pick up the shield, collide with it.
Although the other objects you can carry (such as the zapper and the eggs) appear above the robot’s head when you’re carrying them, the visual indicator that you’re carrying the shield is more subtle: the center of the robot will change colors from blue to yellow. As with the other objects, pressing the fire button will drop the shield.
12. The flashlight

The flashlight also first appears in Level 5. As the levels progress, more and more rooms turn “dark,” and the walls become indistinguishable from the floor. This can make it difficult to navigate if you’re not already familiar with the layout. But if you’re carrying the flashlight, the walls reappear!
13. The warp of death
Starting on Level 4, there is a special “hyperspace” warp you can use to immediately finish the level and begin the next one, but beware: using the warp will cost you a life. And if you run into a warp on your last life, the game will be over.

Normally you would avoid the warp, since it takes one of your lives, but in certain cases where you simply cannot find one of the eggs you need to complete the level, or the eggs and/or other objects you need are inaccessible (for example, an egg, the blue balloon and the magnet are all stuck someplace where there’s no way to get to them), you can sacrifice a life to try your luck on the next level rather than simply losing the game.
When you use a warp to complete a level, you will not earn the normal 1,000-point bonus for completing a level. However, you will retain super-speed if you had it when using the warp.
14. Super-speed and shield colors
The color of the robot’s CPU (center area) can be used to tell whether the robot is super-charged and/or is carrying the shield.
The CPU color is normally dark (dark yellow if you’re carrying the shield, dark blue if you’re not), but the color turns bright if you’re super-charged: bright yellow if you’re carrying the shield, bright blue if you’re not.

Beware, though: if the robot is next to a duck or another object, its CPU receives “interference” from that object and will display the color(s) of that object instead of the blue or yellow described above. For example, if the robot is standing next to a red door, the robot’s center will be red. If the robot is standing next to a bonus object, the center will be the color of that object.

15. Game variations
There are 10 different game variations you can choose from the game select screen. You can choose to begin on Levels 1, 2, 3, 4 or 5, and you can choose to turn Random Mode on or off.
If Random Mode is on, the game objects (eggs, zapper, shield, ducks, etc.) will appear in different locations each time you start a new game. If Random Mode is off, the game objects will appear in the same location each time you start a game. You can set Random Mode off when you’re just getting started learning the layout of the rooms; once you have mastered that, switch Random Mode to “on” to keep the game challenging.
| Start Level | Random Mode | # of rooms | # of ducks | Objects |
|---|---|---|---|---|
| 1 | off | 19 | 2 | Zapper |
| 2 | off | 33 | 3 | Zapper, magnet |
| 3 | off | 52 | 4 | Zapper, magnet, flashlight, shield |
| 4 | off | 55 | 4 | Zapper, magnet, flashlight, shield |
| 5 | off | 58 | 4 | Zapper, magnet, flashlight, shield |
| 1 | on | 19 | 2 | Zapper, magnet |
| 2 | on | 33 | 3 | Zapper, magnet |
| 3 | on | 52 | 4 | Zapper, magnet, flashlight, shield |
| 4 | on | 55 | 5 | Zapper, magnet, flashlight, shield |
| 5 | on | 58 | 5 | Zapper, magnet, flashlight, shield |
To select a game, press GAME SELECT to bring up the game select screen, shown below.

While in the game select screen, you can press GAME SELECT or move the joystick up to increase the starting level, or move the joystick down to decrease the starting level.
Pressing left on your joystick turns Random Mode off; pressing right on your joystick turns Random Mode on.
When you’ve selected the type of game you want to play, press either GAME RESET or the fire button on your joystick to start the game.
16. Difficulty settings
The difficulty switches are used to control how fast the ducks, fireballs, and other creatures move.
The LEFT DIFFICULTY switch controls the speed of fireballs, tanks, poison arrows and similar objects: set it to “A” for fast-moving objects, “B” for normal speed.
The RIGHT DIFFICULTY switch controls the speed of the ducks. Set it to “A” for fast-moving ducks, “B” for normal-speed ducks.
17. Pausing the game
Duck Attack! can be played on either an Atari 2600 (VCS) or 7800.
If you are playing Duck Attack! on a 2600 (or compatible system), the TV TYPE switch is used to pause the game. Move the switch to the B-W position to pause the game; move the switch back to the COLOR position to un-pause the game and resume play.
If you are playing on a 7800 (or compatible system), press the PAUSE button once to pause the game; press it a second time to un-pause the game and resume play.
Another way to pause the game is to move the robot to one of the three “safe rooms” described below: the score room, the egg shelf room, or the credits room.
Duck Attack! is programmed with an “idle” mode which acts as a screensaver. (Certain types of televisions and monitors are affected by screen burn-in if the same image is displayed for too long without changing.)
If no joystick activity is detected for an extended period of time (between about 9 and 11 minutes, depending on the type of console), the screen will turn off (appear all black). To bring the system out of idle mode and resume the game, simply move the joystick, and the game screen will reappear, right where you left it.
18. Game rooms / safe rooms
The first game room you will encounter in a game of Duck Attack! is the score room. This room appears when you first start a game.
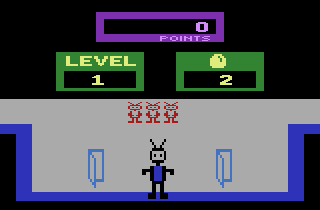
The score room gives you four useful pieces of information:
- Your score
- The level number
- The number of eggs remaining to be collected on this level
- The number of robots (lives) in reserve. You start off with three robots in reserve, and can earn more by completing levels.
The door on the left leads to the main game play area. The door on the right leads to the egg shelf room.
The egg shelf room displays all the eggs you’ve collected so far in the level, along with “holes” where the rest of the eggs will go once you collect them.
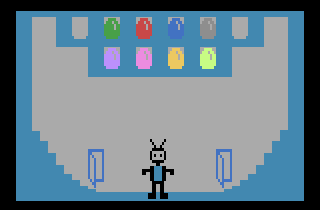
To return to the score room from the egg shelf room, go into the door on the left. If you go into the door on the right instead, you can see the credits room, which shows the game credits and version number.

Each of these three rooms is a “safe room”; while here, no ducks or other creatures can attack you. These are good places to “park” the robot if you need a break from the action. If you need a place to rest and consider your plan of attack, you can retreat to one of these rooms.
A good way to tell which rooms are safe and which are dangerous is by looking at the robot’s antenna and boots: if they are black, the robot is in a safe room; you can stay there indefinitely without risk. If they are white, then you’re in the main game area, and a duck or other creature could come by at any minute, so be vigilant!
If you happen to be carrying an object or objects when entering the safe rooms, they will not be displayed until you leave. If you lose a life in the main game area while carrying an object or objects, those objects will automatically be given to the next robot when it exits the score room; you won’t have to go retrieve them.
19. Scoring
There are lots of ways to rack up points in Duck Attack!
| Action | Points |
|---|---|
| Use an egg to open a door | 200 |
| Complete a level | 1,000 |
| Pick up a bonus item | 100-10,000 |
| Pick up a green balloon | 100 |
| Pick up a pink balloon | 200 |
| Pick up a yellow balloon | 3,000 |
| Pick up a gold balloon | 5,000 |
| Pick up a red balloon | ???? |
| Duck walks over a zapper | 100 |
| Hit a duck with a zapper | 400 |
| Duck walks over a super-zapper | 500 |
| Hit a duck with a super-zapper | 800 |
| Hit a snake with a zapper | 300 |
| Hit a bee with a zapper | 500 |
Each level features a unique bonus item: pick it up for points. The first level bonus is 100 points, the second level bonus is 200 points, etc., all the way up to Level 100, which gives you 10,000 points for picking up the bonus.
20. Continuing a game
Once you lose your last robot, you will be given the option to continue the game at the same level you left off, if you’ve reached Level 6 or higher.

To continue, press the fire button on the joystick before the counter reaches zero. Your score will be reset to zero, you will be given three robots (lives), and you will restart the level number you were on when you lost your last life, minus the number of warps taken.
If you don’t want to continue at the same level you left off, you can either wait until the “continue” count reaches zero, or immediately press GAME SELECT or GAME RESET, to return instead to the game select screen, where you can choose Levels 1 through 5.
21. Ending a game
To end a game and return to the game selection screen, press the GAME SELECT button.
Pressing the GAME RESET button in the middle of a game will sacrifice the current life and return you to the score room.
22. AtariVox features
If you have an AtariVox, SaveKey or compatible device plugged into the right controller port, you can take advantage of the following features.
High score support
When you lose your last life, your score will automatically be added to the “Top 5 scores” (if it’s high enough) before the “Game Over” or “Continue” screen appears. The top 5 scores will then appear once the “Game Over” screen disappears. (If you choose to continue, your score will be saved, but the top 5 score screen will not appear until you finish playing.)

The high scores are stored on the AtariVox (or compatible device). If no device is found, the Top 5 Scores screen will not be displayed.
You can clear the high scores by holding the joystick in the “up” position and pressing GAME RESET while the high scores are being displayed on the screen.
Save and load a game in progress
With an AtariVox or compatible device, you can save your game and return to it later. This is handy if you’ve just beaten a difficult level but need to go do something else (or even just want to play a different video game for a while.) You can save your game, turn off your Atari, and then load your game exactly where you left off when you return.
To save your game, go to the credits room (see the “Game Rooms” section) and press the Fire button on the joystick. If the program was able to save your game successfully, it will move you to the score room. If it was unsuccessful, it will move you to the egg shelf room. It will be unsuccessful if you don’t have an AtariVox or compatible device properly connected to the right joystick port.
To load your game, start a new game (by pressing GAME RESET from the select game screen), then go to the credits room and press GAME RESET again. If the program was able to load the game successfully, it will move you to the score room; if not, to the egg shelf room.
You can re-load a saved game as many times as you like by going to the credits room and pressing GAME RESET. However, only one game can be saved to the AtariVox, so be sure you want to save the current game before pressing the Fire button in the credits room, because any previously saved game will be overwritten.
23. Troubleshooting
If the game appears to be “stuck,” (not responding to the joystick), it may be paused. If you are playing on an Atari 2600 (or compatible system), move the TV TYPE switch to the COLOR position to un-pause the game and resume play.
If you are playing on an Atari 7800 (or compatible system), press the PAUSE button once to un-pause the game and resume play.
If there is no picture (screen is all black), the game has gone into screensaver/idle mode. Push the joystick in any direction to exit screensaver mode and restore the game screen.
24. Tips and tricks
You can carry up to two objects at a time. Plan which two objects will be most useful to have when exploring new areas, and leave the other objects someplace easy to remember so you can retrieve them later as needed.
(The printed manual has additional tips and tricks as a way of saying “thank you” to those who bought the cartridge version of Duck Attack!)
25. Credits
Duck Attack! © 2009-2010 Will Nicholes.
Game design, coding and manual text by Will Nicholes.
Label and manual cover art, manual layout by Nathan Strum.
Special thanks to the lovely Jenni Fritz for extensive beta-testing, to the expert programmers and homebrew fans on the AtariAge forums for their expertise and encouragement, and to my mom and dad for surprising me with that Atari 2600 under the Christmas tree so many years ago.
Visit https://WillNicholes.com/duck for more information about Duck Attack!
The author recommends these excellent Atari 2600 homebrews, also available from AtariAge:
- Lady Bug by John W. Champeau
- Juno First by Chris Walton
- Medieval Mayhem by Darrell Spice Jr.
- Thrust+ Platinum by Thomas Jentzsch
- Fall Down by Aaron Curtis
AtariAge store: https://www.AtariAge.com/
More recommendations, reviews and homebrew project news from the creator of Duck Attack!: https://WillNicholes.com/

Leave a comment